
Quick start guide
for Vev
Whatever business you’d like to start, you can run it on Vev. And best of all, it’s free of charge and you’ll be up and running in under a minute.
This article will help you set up the basics. Pick a template from our homepage if you haven’t done so already. If you have an iPhone or iPad, make sure to download the Vev free app before you continue.
Customize your page
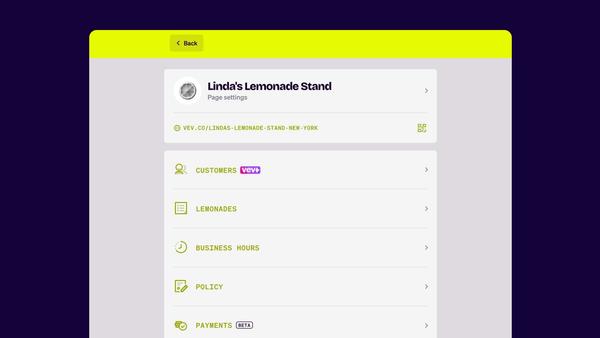
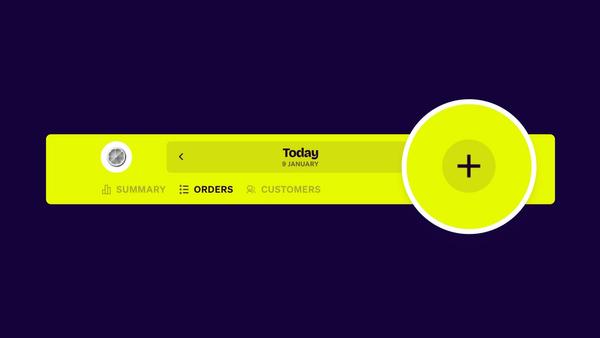
After you sign up, you immediately land on your dashboard. In the upper left corner, tap on the icon.
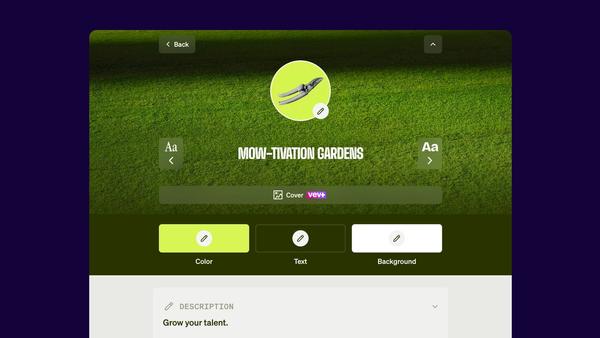
Tapping on your business name will open up the Page Settings. On this page, you can change your business colors, upload a logo, edit your page name, pick a font, write a description, change your email address, add a phone number, and update your address.
In the second block, you can also change your general settings, such as when reminders go out, change the language of your page, and edit your time zone.
Few things we’d like to mention when making changes on this page:
→ Think of your page description as the bio just like your Instagram page. It’s a great way to tell people what you are doing and what makes your business unique. Often, this is the first text people see when they Google your page. Read more on how to write a good page description.
→ By tapping the top right corner of this settings page, you can easily edit the colors of your page. Your entire dashboard, ordering page, and every email will be sent out in these colors. Feel free to play around with it, make sure that it reflects your brand and that everything remains readable.
→ With Vev+ you also can upload a cover image to your page. This image will be shown at the very top of your page. For the best results, upload a high-resolution landscape photo of your salon, workplace, or business. Avoid uploading a portrait image.
Change your offering
Now that the basics are all set, let’s customize your offering. In this example, we are running a bike repair shop. The first item on your dashboard is called Repairs. Tap it to open up the menu editor. Every page comes with a default menu or offering.
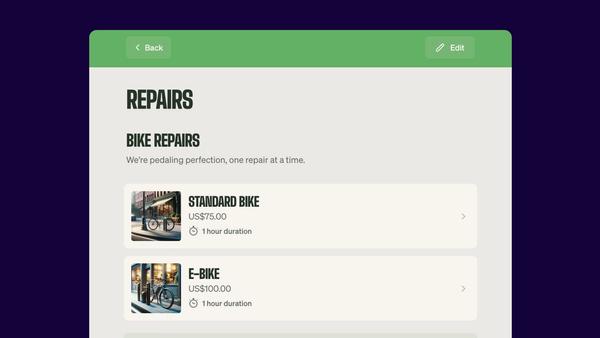
As you can see, there’s a title for your offering. Each item belongs to a category. You can create as many categories as you want and also change the order.
Tap on any of the preloaded items to change it. Clicking it will take you to a subpage. Here, you can change the name, upload a photo, write a brief description, set or update the price, create variants, and add options. Depending on the type of business you run, you might also see the option to set the duration of the appointment. And the additional cleanup time. The latter allows you to reserve an extra couple of minutes in between appointments.
From this page, you can also click ‘Hide’ to remove the item from your page. This is useful if the particular item is not available year-round, and you don’t want to delete it. It can also be used not to offer a particular item or treatment publically. In that case, it can only be added by you as a “manual order”. More about that in a bit.
Few things to keep in mind for this page:
→ Images are always shown in a square box, regardless of the size that you upload it in. If you are not happy with the image, you can replace or delete it by tapping the image.
→ Variants are useful when you offer, for example, a small, normal, and large version of the same product. Or in the case of a spa, when you offer a 50 and 90-minute massage of the same type. Variants have their own price and duration (if applicable). You can also set individual cleanup times for either variant. → Speaking of duration. If you have Vev+, you can also set your own duration. This feature works great if the duration for your customer differs from the actual time you’d like to reserve in your calendar. For example: when a customer books a hair coloring appointment, and they need to wait for a while. In that case, you can squeeze in a second customer who might just want a simple blowout.
→ Options and variants are not the same. An option is used on items or appointments that can be enriched with free or paid extras. A hamburger joint will use this feature to upsell customers to a second patty or to offer a gluten-free bun. Options don’t allow you to add extra time to an appointment or order.
→ For each category, you can also write a brief description. Just go back to the main page and start typing underneath the category name.
New categories and the order of the page can be managed via the Edit button in the top right corner. Tap the button, and you’ll see that a condensed version of your page is shown. Select one or multiple items and hit Delete to remove these items. Or drag and drop a product or the entire category to rearrange the page to your liking. You can create new categories from here by hitting “+ New Category” from the bottom of this page. When you are done, simply hit “Done” in the upper right corner.
Business hours
By default, each page will have a set of suggested opening hours. Click 'Business hours' from your dashboard to review this set.
In this example, the hair salon is open from Monday to Friday between 10am and 4pm. Click 'Regular Hours' to start editing. You can alter the hours for just this window, click additional days that these opening hours are applicable for, or create a second set of hours for the same day.
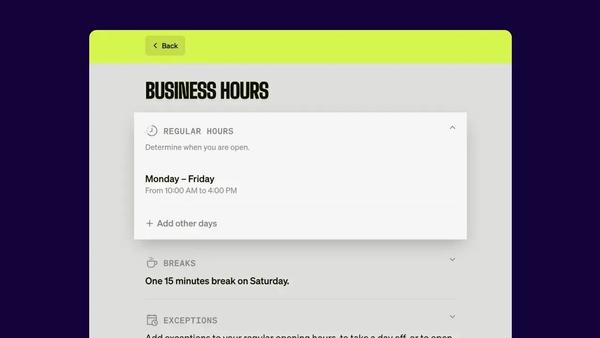
This is useful in case your business runs extended hours on a Friday night, for example. It also works great if you work from 10am till 2pm and reopen between 6pm and 9pm on the same day.
You can create as many sets of opening hours as needed. More on this in a bit, but business hours are repeated until you change them. If your business only operates on select days, for example, in the case of a pop-up, you are better off setting up ‘Exceptions’. Read more about Exceptions.
Breaks and smart breaks
Breaks are also managed from the Business hours page. Click Breaks to set this up, and select the days you'd like the break to apply the break to.
You can set up a fixed break or a smart break. To add a fixed break, you select the duration of your break. In this example we'll say 15 minutes and we'll plan it between 12:00 pm and 12:15 pm.
In that case, customers can't schedule appointments or orders during that window.
Alternatively, you can set up a smart break. You still define the duration, but you'll widen the window for the break to take place. For example, between 12:00 pm and 2:00 pm.
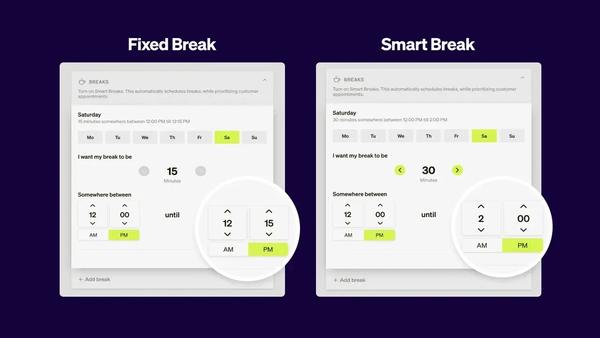
Based on customer demand, the break will stay flexible to offer your customers more flexibility. As soon as the last slot is taken, your break will be locked in somewhere in the defined period. Rest assured, a break is never skipped unless you remove it yourself.
You can take as many (fixed or smart) breaks as you want, and you can even combine fixed and smart breaks throughout the day.
→ Breaks should be scheduled with repetition in mind. You are better off using “Me Time” for when you have to go to the dentist, for example. Read more about Me Time.
→ Before adding a fixed break, we advise you to give Smart Breaks a try. You might be surprised to see what additional flexibility can do for your business!
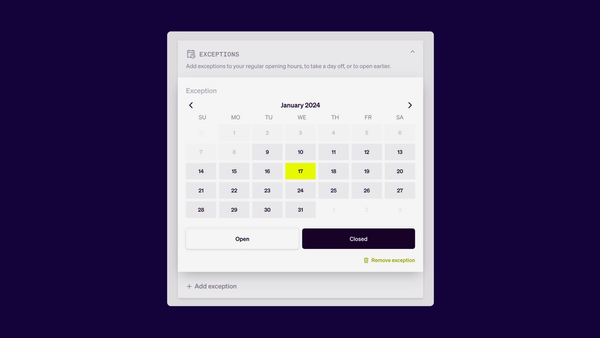
Exceptions
Exceptions work two ways. You can add dates that your business is closed (for example, over New Year's), or be opened in addition to the regular hours. For example, leading up to a holiday.
Click “Add exception” and select the day (or days) for which this exception is applicable. Next, select Open or Closed. If you select Open, you can add the hours for this exception. Remember that these hours overwrite your regular hours for that day or period.
→ Deposits are a great way to encourage a down payment and to eliminate no-shows. Deposits can be set up as a percentage or fixed amount.
→ Your monthly overview will indicate today’s date (with a line underneath the day), have a bright color in case you are open and have received orders. And is circled in case you are open, but don’t have any orders yet.
→ Creating manual orders allows you to double-book yourself intentionally. By default, you might be able to help one customer at the time. But if you schedule something knowing, you’ll see a heads up in the form of the initials of your customers. You can still proceed and select the desired time. Use this feature with caution.
Policy
Every store can set its own order and cancellation policy. Click Policy from the overview of the dashboard.
Order policy
Select Order to review the default policy. In this example, orders can be placed until 1 day before their scheduled pick up. Meaning that if the store is only open on Saturdays, an order should be in by Friday.
You can also change this to a matter of hours or even minutes.
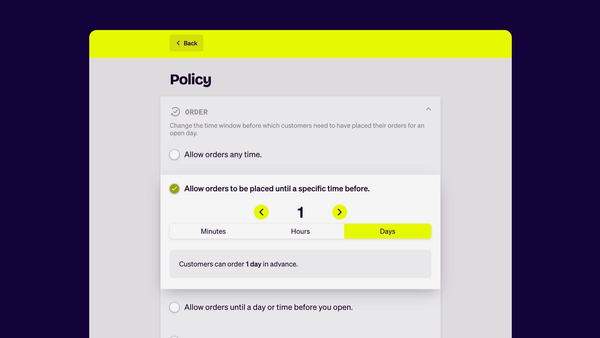
There's more flexibility in this window than there might appear to be. Let's review all options.
- Allow orders at any time - The most straightforward of them all. The most flexible option for customers if they want something right away.
- Allow orders until a set time before the appointment - The order must be in before a specific deadline ahead of pick up/delivery. This could be an actual minute, up to various days in advance. Giving you a bit more time to prepare the order.
- Allow orders until a day or time before you open - Similar to the above option, but with the difference that the cut-off moment is based on your opening hours. Ruling out same-day orders and locks your schedule either minutes, hours, or days before you actually have to fulfill the orders for that day.
- Allow orders until a day and time - A precise cut-off date and time, either at one moment in the week or multiple. Example 1: all orders, regardless of pick up/delivery in the week, need to be placed on Mondays before 10 am. Or you select two or more days with a cut-off, for example, at noon.
Cancellations
There's also granularity when it comes to your cancellation policy. You have 3 options.
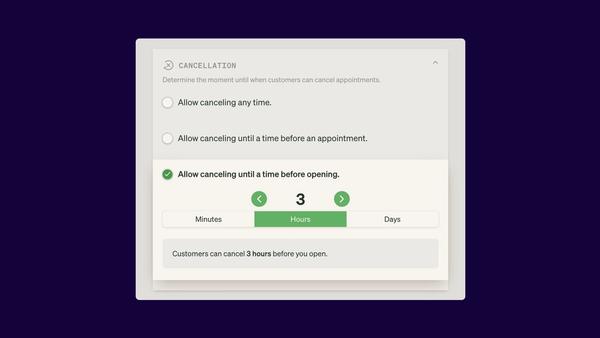
- Allow canceling any time - Your customers can cancel at any point, even if the order should take place in a minute from now.
- Allow canceling until a time before an order - A defined number of minutes, hours, or days ahead of when the order will take place. For example, 3 hours before the scheduled pick-up.
- Allow canceling until a time before opening - Similar to the above, but the cancellation deadline is based on when your business opens that day. For example, the order will take place at 3 pm, but your store opens at 11 am. The defined number of minutes, hours, or days is based on you opening at 11 am.
Add manual orders
You can also add orders yourself to your Vev page. A helpful feature for when orders in person or over the phone come in. In the upper right corner, you'll find the + icon. As soon as you click it, you'll see your entire menu. Including the items you might have marked as Hidden on your product page.
Add the items, and add the details of your customer. New customers must be added once, regulars will show up in the list as soon as you start typing their name. Select the date and time, and hit 'Place order.'
Your customer will automatically receive an email confirmation. Manual orders do not require your customers to pay ahead, or to pay a deposit. They are automatically confirmed since they are created by you. Depending on your cancelation period, a customer is able to reschedule according to your policy.
Another great feature: after two appointments from the same customer, Vev will auto-suggest next appointment dates and times based on the time in between the previous appointments. Over time the suggested date will get more accurate!
Payments
Accept a full payment ahead, a deposit, or let customers scan a QR code on the spot. Activate payments once to get started. Payments can be made securely via debit and credit cards, or various local payment methods. Read more about how to accept online payments.
Confirmations and reminders
Every order or reservation is confirmed with an automated email. The email contains an overview of what the customer has ordered. The date and time. Including buttons to add the details to their calendar app of choice. It’s also possible to add the details to Apple Wallet for extra convenience. In that case, the order details show up on the lock screen of the iPhone a few hours before the appointment.

The email also includes buttons to reschedule or cancel the appointment or order. Including a line till when this is possible. This deadline is based on the policy you’ve set. Read more on policy settings.
After the initial confirmation, a reminder will also go out on your behalf. This email contains all order information, just like the original confirmation. This reminder goes out to help you combat no-shows. By default, this email goes out 24 hours before the order. You can change the time from the “Page settings” under your store name in the dashboard.
Spread the word about your page
Customers will be able to find your page, as soon as you start promoting it. There are various ways to let the orders roll in:
QR Code
From the settings page on your dashboard, you can click on the little QR-symbol next to your page url. You can download the QR code and use this in printed promotional material, such as your business cards or on your front door.
Link in bio
Add the link to your Instagram bio by opening up the Instagram app. Tap your profile icon in the bottom right corner. Select “Edit profile”. Under links you can add your Vev link. Instagram allows you to add more than one link. You can give your link also a title, for example: “Book online” and “Order online” are great titles to help your customers find your Vev page easily.
Add to Google My Business
Google allows you to add a direct link to your booking page, in addition to your regular website. Via the Google My Business portal you can manage your Google Maps listing. Under “Reservations” you can paste your Vev link. Go to Google My Business. This way, your Vev-link will be shown in Google when people search for your business name.
Social media post
Celebrate the fact that people can now book or order online with a post on your social media profile. For this occasion, we have created a few images you can use free of charge. Make sure to include the link to your page in the post on Facebook, and add it to your bio on Instagram. Download images to share on social media.
Email your customers
If customers are used to email or text you to make an appointment or place their order, you might wanna tell them that they can now do that online themselves. A simple email with a link to your Vev page will do the trick. To make this easy, we’ve created a few example emails that you can use. Go to example emails to tell customers they can now book online.
Whatsapp Welcome Message
If you have a Whatsapp Business Account, you can set up automated responses when you get a message. We see that a lot of businesses benefit from adding their Vev link in this first response message:
1) Open Whatsapp and click More Options, go to Activity Tools and select Welcome Message.
2) Now enable: Send Welcome Message.
3) Tap Welcome Message to edit the text and save your message when finished. Make sure to include your Vev link!
Bonus tips
A few more tips to make sure you’ll get the most out of Vev:
→ Enable notifications in your browser or via the app to get a quick message as soon as someone books an appointment, makes a change, or has paid for their order.
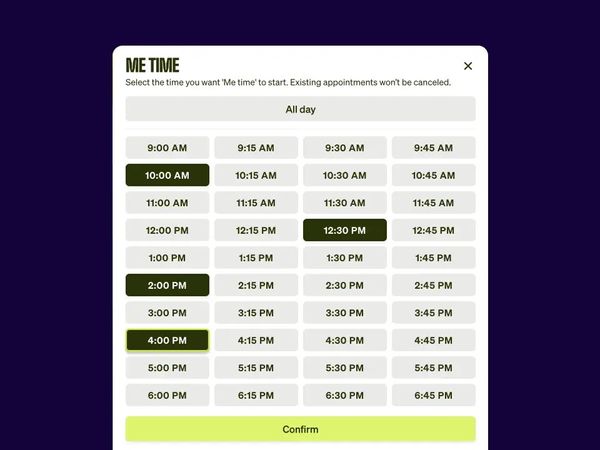
→ Me Time allows you to quickly block time in your calendar. On a day that you are open, select the heart icon that says “Add Me Time” when you are in the appointment view. From here, you can either select “All day” to quickly be closed for the rest of the day. Orders that are already in for that day will stay there. Or select the applicable blocks of 15 minutes to be closed. Hit “Confirm” to confirm your selection. Customers will not be able to schedule anything when you take Me Time.
→ Scan to Pay is a great way to let customers pay from the comfort of their own device. In that case, customers can pay via a QR code that pops up on your screen, and they’ll complete the transaction on their own device. Read more about payments
→ From the appointment view, you can also change an appointment, or delete it, on behalf of your customer. Click the three dots to select “Change time”, “Cancel appointment” or “Mark as Done”. Customers will get an email if you change the time or cancel the appointment.
→ If you are not using online payments with Vev, you can still mark orders as paid by hand. From the overview, hit “Mark as paid” to keep track. You’ll see that the label is updated to “Paid” instead of “Not paid”.
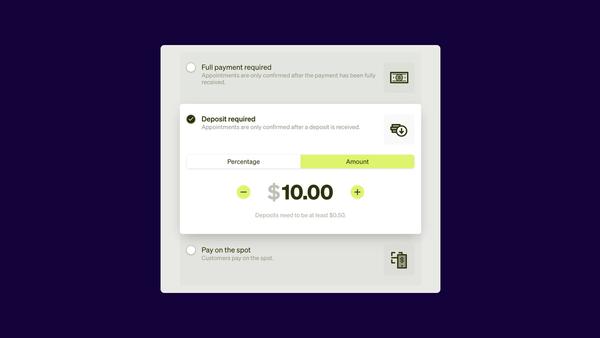
→ Deposits are a great way to encourage a down payment and to eliminate no-shows. Deposits can be set up as a percentage or fixed amount.
→ Your monthly overview will indicate today’s date (with a line underneath the day), have a bright color in case you are open and have received orders. And is circled in case you are open, but don’t have any orders yet.
→ Creating manual orders allows you to double-book yourself intentionally. By default, you might be able to help one customer at the time. But if you schedule something knowing, you’ll see a heads up in the form of the initials of your customers. You can still proceed and select the desired time. Use this feature with caution.
Create your own page in 3 simple steps
Find your profession
Choose from over 200 example businesses.
Get started
Click around to see how Vev works.
Customize your page
Add photos, descriptions and set your pricing.